


When you register a .co.za domain for your South African business, understanding DNS for co.za domains becomes essential to getting your website online. The domain name system might sound technical, but it's simply the internet's phonebook—translating your memorable domain name into the numerical IP address that computers use to find your website.
Without DNS, visitors would need to remember strings of numbers instead of your business name, making the internet virtually unusable for everyday users.
We've helped hundreds of South African businesses navigate the DNS setup process, and we know the confusion that often comes with terms like nameservers, A records, and propagation. This comprehensive guide will demystify DNS for co.za domains and walk you through the setup process step by step, ensuring your domain connects properly to your web hosting, email services, and other online tools.
Key Takeaways
- DNS translates domain names into IP addresses that computers use to locate your website server across the internet
- ZARC operates .co.za domains as South Africa's official registry, providing world-class security and reliability standards
- Three prerequisites are essential: a registered domain, access to DNS settings, and your web server's IP address
- DNS propagation takes 24-48 hours for changes to spread globally across all DNS servers
- Free DNS management is included with most .co.za domain registrations from South African registrars
Understanding DNS for co.za Domains and How the System Works
What Is the Domain Name System?
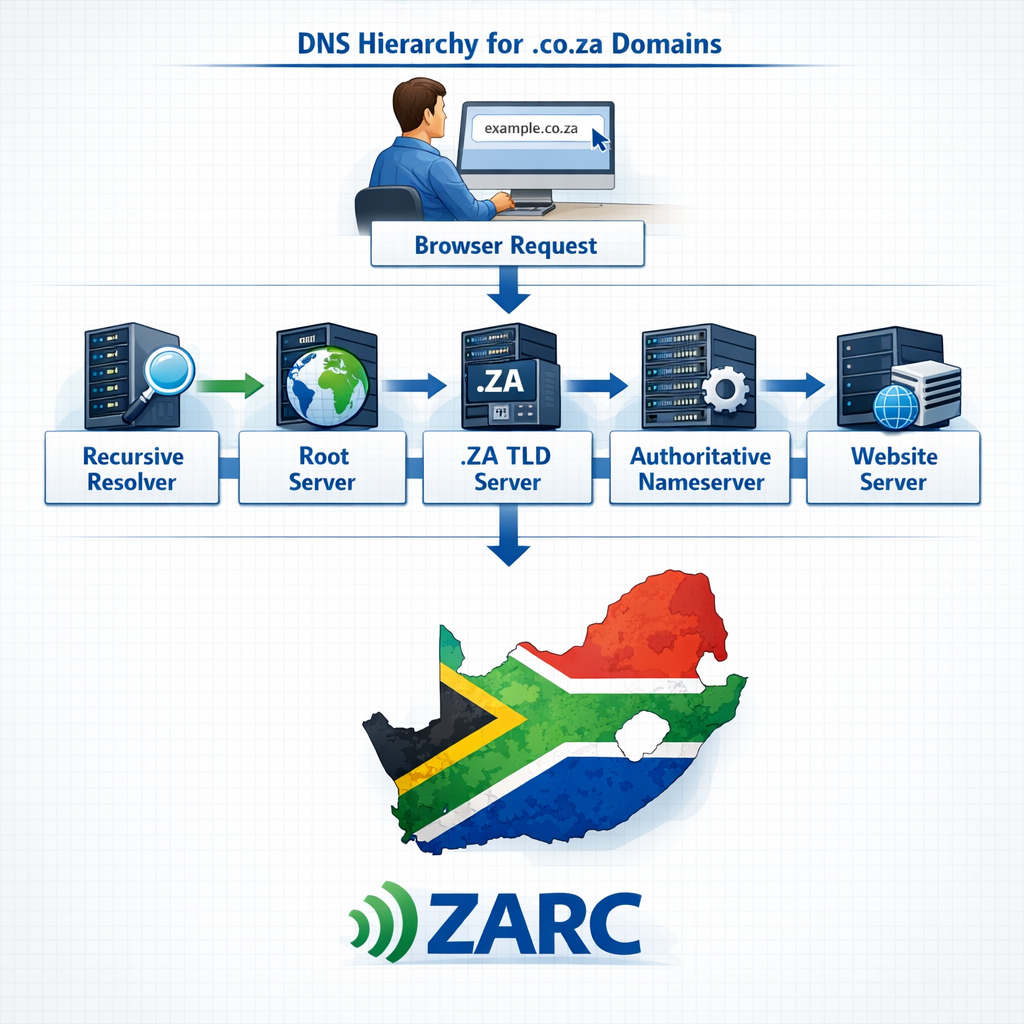
The domain name system serves as the backbone of internet navigation, converting human-friendly domain names like "yourbusiness.co.za" into numerical IP addresses that computers understand. Think of it as an automated directory service that works behind the scenes every time someone visits your website.
When a visitor types your .co.za domain into their browser, their computer doesn't inherently know where to find your website. Instead, it queries DNS servers in a hierarchical process that ultimately directs them to your web server. This happens in milliseconds, creating the seamless browsing experience users expect.
The DNS hierarchy for .co.za domains follows a specific structure:
- Root servers - The internet's top-level directory
- .za TLD servers - Managed for South Africa's country code
- .co.za authoritative nameservers - Operated by ZARC
- Your domain's nameservers - Provided by your registrar or hosting service
ZARC (ZA Registry Consortium) operates South Africa's second-level domains including .co.za, providing world-class standards for domain security and reliability as a proudly South African initiative. This local management ensures your domain benefits from infrastructure designed specifically for South African internet users.
How DNS Works for Your .co.za Domain
The DNS resolution process begins the moment someone enters your domain name. Here's what happens in those crucial milliseconds:
Your visitor's browser first checks its local cache to see if it recently looked up your domain. If not, it contacts a recursive resolver (usually provided by their internet service provider) which then queries the DNS hierarchy.
The resolver asks root servers for the .za TLD servers, then queries those for your domain's authoritative nameservers, and finally retrieves the specific DNS records that point to your website server.
This multi-step verification process ensures accuracy and security. Each DNS server along the chain cache DNS records for a specified time to live (TTL), reducing the need to repeat the full lookup process for every visitor.
Key components that make DNS work:
- Nameservers - Store and provide your domain's DNS records
- DNS records - Define where your domain points for different services
- TTL values - Control how long DNS information stays cached
- Authoritative servers - Hold the official, up-to-date records for your domain
For .co.za domains specifically, the ZA Central Registry (ZACR) maintains the central database of all .co.za domain names and handles the technical backend, while ZADNA (the ZA Domain Name Authority) sets policy under the Electronic Communications and Transactions Act, 2002. This dual structure ensures both technical excellence and proper governance.
Common DNS Record Types You'll Use
Understanding different types of records helps you control how your domain connects to various services. Each record type serves a specific purpose in directing internet traffic.
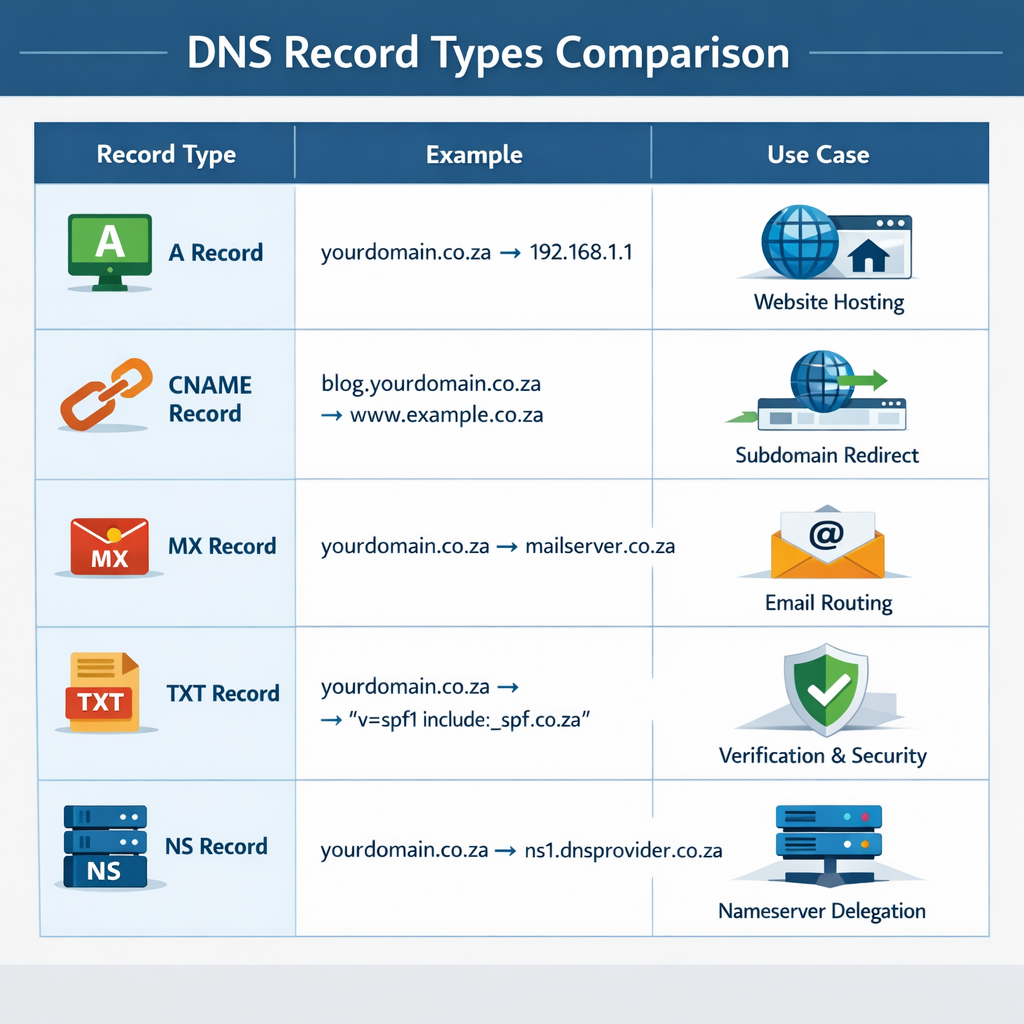
A Record (Address Record)
Points your domain directly to an IPv4 address. This is the most fundamental record—it tells browsers where to find your website. For example, "yourbusiness.co.za" might point to "192.168.1.1" where your web server lives.
CNAME Record (Canonical Name)
Creates an alias that points one domain to another. You'll often use this for subdomains like "www.yourbusiness.co.za" to point to "yourbusiness.co.za", or to connect third-party services that require a subdomain.
MX Records (Mail Exchange)
Directs email for your domain to the correct mail servers. These records include priority numbers, allowing you to set up backup email servers. Without proper MX records, emails sent to your @yourbusiness.co.za addresses won't reach their destination.
TXT Records
Store text information for various purposes, most commonly for email verification, domain ownership verification, and SPF records that help prevent email spoofing. Many third-party services require you to add specific TXT records to verify domain ownership.
NS Records (Nameserver Records)
Specify which nameservers are authoritative for your domain. These tell the DNS system where to find all your other DNS records. When you change web hosting providers, you'll often update these records.
Major South African registrars offer free DNS management and free DNS hosting on geographically redundant nameservers with .co.za domain registrations, even if your website is hosted elsewhere. This flexibility allows you to register domains with one provider while hosting your website with another.
Requirement for Setting Up DNS for co.za Domains
What You Need Before Getting Started
Before you can configure DNS settings, you must have three essential elements in place. Missing any of these will prevent you from completing the setup process successfully.
1. A Registered .co.za Domain Name
You need an active .co.za domain that you own or manage. If you haven't registered your domain yet, you can register your .co.za domain name through an accredited registrar. The domain must be active—expired or pending domains cannot have their DNS configured.
2. Access to DNS Settings
You must be able to log into your domain registrar or hosting provider account and access the DNS management section. This typically requires your account credentials and may involve two-factor authentication for security. Some registrars restrict DNS access until payment is confirmed or domain verification is complete.
3. Your Web Server's IP Address
You'll need the correct IP address from your web hosting provider where your website files are stored. This is typically a series of numbers like "192.168.1.1" (IPv4) or a longer alphanumeric string for IPv6. Your hosting provider should provide this information in your welcome email or hosting dashboard.
"We've seen countless businesses struggle with DNS setup simply because they didn't have their hosting IP address handy. Always gather all prerequisites before starting the configuration process—it saves hours of frustration." - Allanux Web Support Team
Optional Information That Makes Setup Easier
While not strictly required, having these additional details ready streamlines the setup process:
Email Server Details
If you're setting up professional email using your domain (like info@yourbusiness.co.za), gather your email hosting provider's MX record information. This includes server names, priority numbers, and any required SPF or DKIM records for email authentication.
Third-Party Service Requirements
Many businesses use external services like email marketing platforms, website builders, or CDN services. These often require specific DNS records (usually CNAME or TXT records) to function properly. Check your service provider's documentation for their DNS requirements.
Nameserver Information
If you plan to use custom nameservers from a third-party DNS hosting provider like Cloudflare, have those nameserver addresses ready. Registrars like Allanux Web allow you to use custom nameservers during domain configuration, with default nameservers provided automatically
Understanding domain registration basics helps you navigate the relationship between your registrar, hosting provider, and DNS management. These three services mostly come from the same company, which is why clear documentation of your accounts and credentials is essential.
Locating Your Domain Registrar and DNS Dashboard
If you're unsure where your domain is registered or how to access DNS settings, follow these steps:
Check Your Email Records
Search your email for confirmation messages from when you purchased the domain. Look for terms like "domain registration," "welcome," or ".co.za" in emails from the past year. These typically include login links and account information.
Use WHOIS Lookup
Visit a WHOIS lookup service and enter your domain name. The results will show your domain registrar and registration details. However, note that ZACR provides default WHOIS data redaction for individual registrants to comply with POPIA (Protection of Personal Information Act), protecting personal information from scraping and misuse.
Access Your Hosting Provider Dashboard
If your domain registration and web hosting are with the same provider, log into your hosting account and navigate to sections labeled "My Domains," "Domain Management," or "DNS Settings." Different providers use different terminology, but the concept remains the same.
For businesses using web hosting services from Allanux Web, DNS management is integrated directly into your control panel for convenient access â here is how to add or edit a DNS record in Plesk. This unified approach simplifies the management process, especially when running multiple domains.
Step-by-Step Guide to Setup DNS for co.za Domains
Accessing Your DNS Management Dashboard
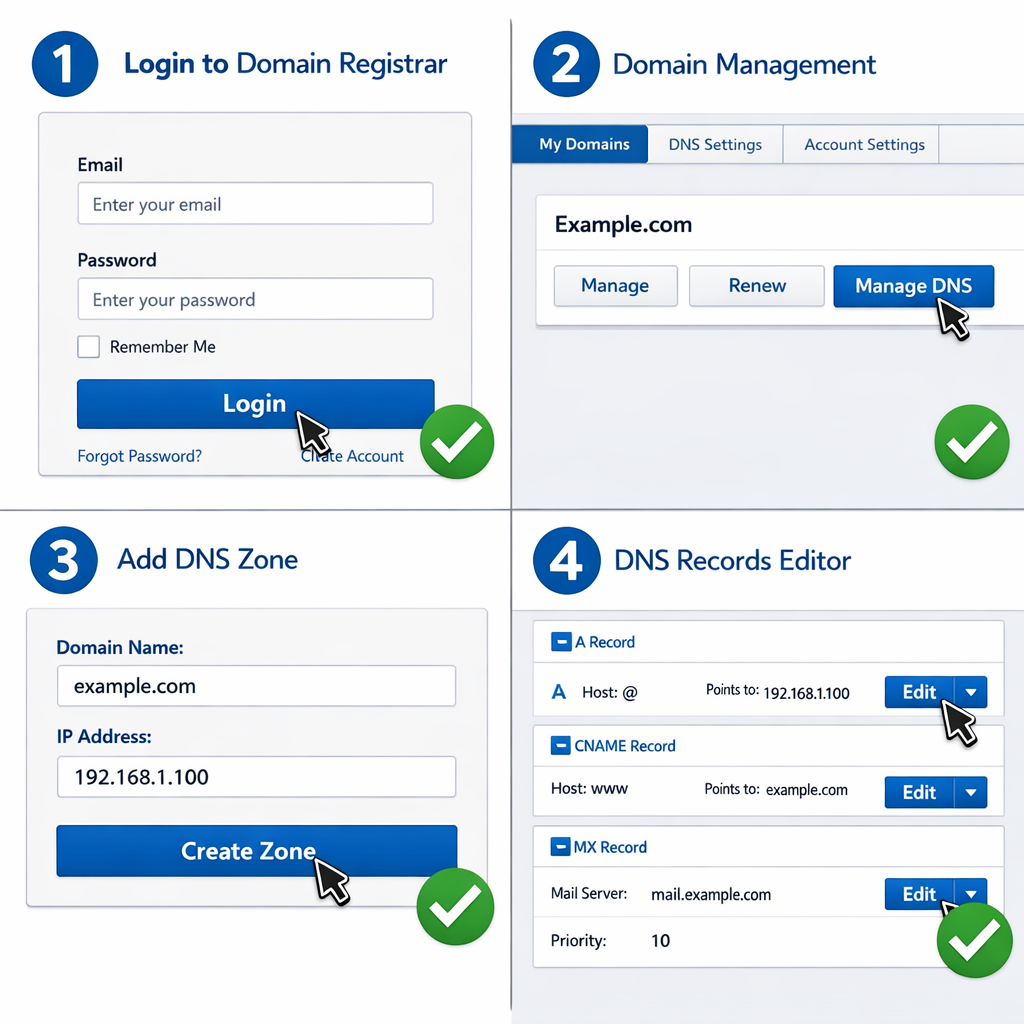
The first step in configuring DNS for co.za domains is locating and accessing your DNS management area. This process varies slightly depending on your domain registrar, but the general approach remains consistent.
For Most South African Registrars:
- Navigate to your registrar's website and click the login button
- Enter your account credentials (username/email and password)
- Look for menu items labeled "Domains," "My Domains," or "Domain Management"
- Find your .co.za domain in the list and click "Manage," "Edit," or "DNS Settings"
- Locate the "DNS Management," "Manage DNS," or "DNS Zone" option
Access your DNS settings by logging into your registrar or hosting provider account, then navigating to sections labeled "Manage Domains," "Domain Management," or "DNS Settings," depending on your provider. Some providers place DNS management under advanced settings or require you to enable it separately.
Creating Your DNS Zone
Many registrars require you to create a DNS zone before you can add individual records. A DNS zone is essentially a container that holds all the DNS records for your domain.
To create a DNS zone:
- Click "Add DNS Zone" or similar option in your DNS management area
- Select your domain name from the dropdown menu (e.g., yourbusiness.co.za)
- Enter your web server's IP address if prompted
- Click "Create" or "Save" to establish the zone
Once created, you'll see an editable DNS zone for your domain where you can add, modify, or delete individual DNS records.
Configuring Essential DNS Records
With your DNS zone active, you can now add the specific records that connect your domain to your services. We'll cover the most common configurations that nearly every website needs.
Setting Up Your A Record
The A record is your primary record that points your domain to your web server. Here's the exact process:
- In your DNS management dashboard, click "Add Record" or the plus (+) icon
- Select "A" from the record type dropdown menu
- In the "Host" or "Name" field, enter "@" (this represents your root domain)
- In the "Points To" or "Value" field, enter your web server's IP address
- Leave TTL (Time to Live) at the default setting (usually 3600 seconds or 1 hour)
- Click "Save" or "Add Record"
To set up an A record: select "A" from the record type menu, enter "@" for your main domain or specify a subdomain, enter your web server's IP address, leave TTL at default unless instructed otherwise, and save the record.
Adding a CNAME Record for WWW
Most businesses want both "yourbusiness.co.za" and "www.yourbusiness.co.za" to work. A CNAME record accomplishes this:
- Click "Add Record" again in your DNS manager
- Choose "CNAME" as the record type
- Enter "www" in the Host/Name field
- In the Points To field, enter your root domain (yourbusiness.co.za)
- Keep TTL at default
- Save the record
For subdomains, choose "CNAME" from record types, enter the alias (e.g., "www"), specify the target domain (e.g., "yourdomain.co.za"), keep TTL at default, and save
Configuring MX Records for Email
If you're using email hosting or email hosting and domains services, you'll need to add MX records:
- Select "MX" as the record type
- Leave the Host field blank or enter "@"
- Enter your mail server address (provided by your email host)
- Set the priority number (usually 10 for primary, 20 for backup)
- Save the record
- Repeat for additional mail servers if you have backups
Adding TXT Records for Verification
Many services require TXT records to verify domain ownership:
- Choose "TXT" as the record type
- Enter the Host name specified by the service (often "@" or a subdomain)
- Paste the exact verification string provided by the service
- Save the record
Common uses include Google Workspace verification, SPF records for email authentication, and DKIM records for email security.
Updating Nameservers (If Required)
Some hosting providers or DNS services require you to point your domain to their nameservers instead of managing individual records. This is common when using services like Cloudflare or when your hosting provider offers managed DNS.
To update nameservers:
- Obtain the nameserver addresses from your new provider (usually 2-4 addresses)
- In your domain registrar account, find "Nameservers" or "DNS Servers"
- Select "Use Custom Nameservers" or "Change Nameservers"
- Enter each nameserver address in the provided fields
- Save the changes
Important: Changing nameservers replaces ALL your existing DNS records with those managed by the new nameserver provider. Only do this if you're certain it's required.
Registrars allow you to use custom nameservers during domain configuration, with default nameservers provided automatically. This flexibility lets you choose between your registrar's DNS hosting or a third-party DNS service.
Verifying Your DNS Configuration
After adding or updating DNS records, verification ensures everything is configured correctly before propagation completes.
Using Online DNS Lookup Tools
Several free tools help you check DNS records:
- Visit a DNS lookup service or DNS checker website
- Enter your domain name (yourbusiness.co.za)
- Select the record type you want to verify (A, CNAME, MX, etc.)
- Review the results to confirm they match your configuration
Command Line Verification ????
For technical users, command-line tools provide quick verification:
nslookup yourbusiness.co.za
dig yourbusiness.co.za
These commands query DNS servers directly and display the current records they're serving for your domain.
What to Look For:
- A records should show your correct IP address
- CNAME records should point to the right target domain
- MX records should list your mail servers with correct priorities
- TXT records should contain the exact verification strings
If records don't appear immediately, don't panic—DNS propagation takes time, which we'll cover in the next section.
Understanding DNS Propagation for co.za Domains

What Is DNS Propagation and Why Does It Take Time?
DNS propagation refers to the time it takes for DNS changes to spread globally across all DNS servers on the internet. When you update DNS records for your .co.za domain, those changes don't appear instantly worldwide—they need to propagate through the hierarchical DNS system.
When DNS records are updated, changes must propagate across the global DNS server network through recursive resolvers, ISPs, and network operators, with the hierarchical system checking local caches, recursive resolvers, root servers, and TLD servers before reaching authoritative nameservers.
Why propagation takes time:
- Caching mechanisms - DNS servers cache records for the duration specified by TTL to reduce query load
- Geographic distribution - Thousands of DNS servers globally need to update their cached information
- Hierarchical updates - Changes must flow from authoritative nameservers through multiple levels
- ISP refresh cycles - Internet service providers update their DNS caches on different schedules
The typical propagation timeframe for .co.za domains is 24 to 48 hours, though many changes complete within 6-12 hours. Some users may see your new configuration immediately, while others might still see old information until their local DNS cache refreshes.
Factors That Affect Domain Propagation Speed
Several variables influence how quickly your DNS changes propagate across the internet:
TTL Settings
Time to Live values determine how long DNS servers cache your records. Lower TTL values (like 300 seconds or 5 minutes) mean faster propagation but more frequent queries to your nameservers. Higher values (like 86400 seconds or 24 hours) reduce server load but slow propagation.
DNS Server Locations
Geographically distributed nameservers help speed propagation. ZARC operates redundant nameservers across South Africa, ensuring reliable and relatively fast updates for local users [1].
ISP Caching Policies
Some internet service providers ignore TTL settings and cache records for longer periods to reduce bandwidth. This is beyond your control but explains why some users see changes faster than others.
Record Type
Simple A records typically propagate faster than complex configurations involving multiple CNAME chains or extensive MX record setups.
"We always advise clients to make DNS changes during low-traffic periods and to communicate the timing with their team. Having a 24-48 hour buffer prevents panic when some users report issues while others see the new site perfectly." - Allanux Web Technical Team
Potential Issues During DNS Propagation
While propagation occurs, you might encounter temporary inconsistencies. Understanding these helps you troubleshoot and reassure concerned clients or team members.
Until complete propagation occurs, users may experience: stale website content from outdated servers, connection timeouts from unresponsive IP addresses, email delays or undeliverable messages with incorrect MX records, and software connectivity issues [2].
Common Propagation-Related Problems:
Mixed Content Issues
Some visitors see your new website while others still see the old one, creating confusion about which version is "real." This is normal during propagation and resolves once all DNS servers update.
Email Delivery Problems
Messages might bounce or delay if MX records haven't propagated to all mail servers. Critical business communications should be monitored closely during DNS transitions.
SSL Certificate Warnings
If you've moved to a new hosting provider with different SSL certificates, some users might see security warnings until their DNS resolves to the new server.
Third-Party Service Disruptions
Services that rely on DNS records (like CDNs, email marketing platforms, or analytics tools) might experience temporary interruptions.
Checking DNS Propagation Status
Rather than waiting blindly, you can actively monitor propagation progress using specialized tools.
Global DNS Propagation Checkers
Online tools query DNS servers from multiple geographic locations worldwide, showing you which regions have received your updates. Search for "DNS propagation checker" and enter your domain to see real-time status across continents.
What the Results Mean:
- ✅ Green checkmarks indicate servers showing your new records
- ❌ Red X marks show servers still serving old information
- ???? Yellow or orange might indicate partial updates or mismatches
Local DNS Cache Flushing
Your own computer caches DNS information, which can make it appear that changes haven't propagated when they actually have. Flush your local DNS cache to see current records:
- Windows: Open Command Prompt and type
ipconfig /flushdns - Mac: Open Terminal and type
sudo dscacheutil -flushcache - Linux: The command varies by distribution, often
sudo systemd-resolve --flush-caches
After flushing, try accessing your domain again to see if you now reach the new server.
Tips for Smoother DNS Transitions
Based on our experience helping South African businesses manage DNS changes, these strategies minimize disruption:
Lower TTL in Advance
If you know you'll be making DNS changes (like switching hosting providers), reduce your TTL to 300-600 seconds a day or two beforehand. This ensures servers won't cache old records for long periods. After propagation completes, raise TTL back to normal levels.
Make Changes During Off-Hours
Schedule DNS updates during your lowest traffic periods—typically late evening or early morning. This minimizes the number of users affected by any temporary inconsistencies.
Keep Old Services Running
When switching hosting providers, keep your old server active for 48-72 hours after updating DNS. This ensures users still reaching the old server via cached DNS records can access your site.
Test Before Going Live
Use your computer's hosts file to preview your new configuration before updating DNS. This lets you verify everything works correctly without affecting other users.
Communicate with Stakeholders
Inform your team, clients, or customers about planned DNS changes and potential temporary issues. Setting expectations prevents unnecessary support tickets.
Understanding domain transfer processes helps when moving your .co.za domain between registrars, as transfers also involve DNS considerations and propagation periods. Our guide explains why DNS changes take time to propagate in your hosting control panel.
Troubleshooting Common DNS Issues for co.za Domains
DNS Records Not Updating
One of the most frustrating issues is when you update DNS records but don't see the changes reflected. Several factors might cause this problem.
Verify You're Editing the Correct Zone
If you have multiple domains or subdomains, ensure you're editing the DNS zone for the right domain. It's surprisingly common to accidentally update records for "yourbusiness.com" when you meant to change "yourbusiness.co.za."
Check Nameserver Configuration
Your DNS records only matter if your domain is pointing to the nameservers where those records exist. Verify that your domain's nameserver settings match the DNS hosting provider where you're making changes.
To check: Use a WHOIS lookup tool to see which nameservers your domain currently uses, then confirm these match where you're editing records.
Clear Browser and DNS Caches
Your browser caches DNS information separately from your operating system. Try accessing your domain in a private/incognito browser window or from a different device to rule out local caching issues.
Allow Sufficient Propagation Time
Patience is often the solution. If you've made changes within the last 48 hours, propagation might still be ongoing. Use global DNS checkers to monitor progress rather than assuming something is broken.
Contact Your Registrar
If records still don't update after 72 hours, contact your domain registrar's support team. There might be account-level restrictions, pending verification requirements, or technical issues preventing updates.
Website Not Loading After DNS Changes
You've updated your A record, propagation has completed, but your website still won't load. Here's how to diagnose the problem:
Verify the IP Address
Double-check that you entered the correct IP address in your A record. A single digit error makes your domain point to the wrong server (or nowhere at all). Contact your web hosting provider to confirm the exact IP address.
Test Direct IP Access
Try accessing your website by entering the IP address directly in your browser (http://192.168.1.1). If the site loads via IP but not via domain, the issue is definitely DNS-related. If it doesn't load via IP either, the problem is with your web server or hosting configuration.
Check DNS Propagation
Use a DNS propagation checker to confirm your domain is resolving to the correct IP address globally. If some regions show the right IP while others don't, propagation is still ongoing.
Review Web Hosting Configuration
Your web server needs to be configured to respond to requests for your domain name. Contact your hosting provider to ensure your domain is properly added to your hosting account and that any required virtual host configurations are in place.
For businesses using WordPress hosting, ensure your WordPress site URL settings match your domain name—mismatches can prevent the site from loading even when DNS is correct.
Email Not Working with New DNS Settings
Email issues after DNS changes are particularly disruptive for businesses. Here's how to troubleshoot:
Verify MX Records
Use an MX record lookup tool to confirm your mail exchange records are correctly configured. Check that:
- The mail server addresses are spelled correctly
- Priority numbers are set appropriately (lower numbers = higher priority)
- Records point to your actual mail server, not your web server
Test Email in Both Directions
Try sending emails FROM your domain and TO your domain. Sometimes outbound works while inbound fails (or vice versa), indicating different issues.
Check SPF and DKIM Records
If emails are being rejected or marked as spam, verify your SPF and DKIM TXT records are properly configured. These authentication records tell receiving servers that emails from your domain are legitimate.
Allow Extra Time for Email Propagation
Email systems can be more sensitive to DNS changes than websites. Mail servers across the internet need to update their cached MX records, which sometimes takes longer than standard propagation.
Verify Email Account Configuration
If you're using email hosting services, confirm your email client settings (IMAP/SMTP servers, ports, authentication) match your email provider's requirements.
Domain Showing "DNS_PROBE_FINISHED_NXDOMAIN" Error
This error message means the DNS lookup failed—the domain name couldn't be resolved to an IP address.
Common Causes:
Domain Not Fully Registered
If you recently registered your .co.za domain, it might not be fully active yet. Domain registration typically processes within minutes, but can occasionally take several hours.
Nameservers Not Set
Your domain might not have nameservers configured at all. Check your domain registrar account to ensure nameservers are specified (either your registrar's default nameservers or custom ones).
Typo in Domain Name
Verify you're typing the domain correctly—a single character mistake produces this error. Try copying and pasting the domain from your registrar account.
DNS Zone Not Created
Some registrars require you to manually create a DNS zone before records will work. Check if you need to initialize DNS management for your domain.
Recent Transfer Issues
If you recently transferred your domain, DNS might be disrupted during the transition. Transferring an existing .co.za domain typically takes around 5 calendar days once you obtain an authorization code. During this period, DNS can be unreliable.
Subdomain Not Resolving Correctly
Your main domain works fine, but subdomains like "shop.yourbusiness.co.za" or "blog.yourbusiness.co.za" won't load.
Check Subdomain Records
Verify you've created specific DNS records for each subdomain. Subdomains don't automatically inherit your root domain's A record—they need their own A record or CNAME record.
Verify CNAME Target
If using a CNAME record, ensure it points to a valid target that itself has a working A record. CNAME chains (CNAME pointing to another CNAME) can cause resolution failures.
Wildcard Records
If you want all subdomains to point to the same place, consider using a wildcard A record (using "*" as the host name). This catches any subdomain that doesn't have a specific record.
Third-Party Service Configuration
If your subdomain connects to a third-party service (like a website builder or e-commerce platform), verify you've followed their exact DNS configuration instructions, including any required verification steps.
Understanding these common issues helps you troubleshoot independently and communicate effectively with support teams when needed. Most DNS problems have straightforward solutions once you identify the root cause.
Advanced DNS Management Tips for co.za Domains
Using Multiple DNS Records for Redundancy
Reliability matters for business websites. Setting up redundant DNS configurations ensures your site remains accessible even if one server fails.
Multiple A Records
You can add multiple A records for the same hostname, each pointing to different IP addresses. DNS servers will rotate between them (round-robin), distributing traffic and providing automatic failover if one server becomes unavailable.
Example configuration:
- yourbusiness.co.za → 192.168.1.1 (Primary server)
- yourbusiness.co.za → 192.168.1.2 (Backup server)
Backup MX Records
Always configure at least two MX records with different priority numbers. If your primary mail server goes down, emails automatically route to the backup server, preventing message loss during outages.
Example:
- Priority 10: mail1.yourbusiness.co.za
- Priority 20: mail2.yourbusiness.co.za
Geographic Distribution
For businesses serving customers across South Africa and internationally, consider using multiple servers in different geographic locations. This improves load times for distant users and provides geographic redundancy.
Optimizing TTL Values for Different Scenarios
Time to Live settings significantly impact how quickly DNS changes propagate and how much load your nameservers handle.
Standard Operations
For stable configurations that rarely change, use higher TTL values (3600-86400 seconds / 1-24 hours). This reduces DNS query load and improves performance through efficient caching.
Before Planned Changes
Lower TTL to 300-600 seconds (5-10 minutes) 24-48 hours before making DNS changes. This ensures caches expire quickly, speeding propagation when you update records.
After Changes Complete
Once propagation finishes and everything works correctly, raise TTL back to normal levels. Keeping low TTL permanently increases unnecessary DNS traffic and can impact performance.
Different Records, Different TTLs
Consider varying TTL by record type:
- A records: 3600 seconds (stable web server IPs)
- MX records: 7200 seconds (email infrastructure changes infrequently)
- TXT records: 1800 seconds (verification records might need occasional updates)
Implementing DNS Security Best Practices
Protecting your DNS configuration prevents hijacking, spoofing, and other security threats.
Enable DNSSEC
DNS Security Extensions add cryptographic signatures to DNS records, preventing attackers from redirecting your domain to malicious servers. Check if your registrar supports DNSSEC for .co.za domains and enable it for added protection.
Use Registry Lock
Some registrars offer domain locking features that prevent unauthorized DNS changes or domain transfers. Enable these protections, especially for critical business domains.
Monitor DNS Changes
Set up monitoring alerts to notify you when DNS records change. This helps you detect unauthorized modifications quickly and respond before they cause damage.
Secure Registrar Account
Use strong, unique passwords and enable two-factor authentication on your domain registrar account. Most DNS hijacking occurs through compromised account credentials rather than technical exploits.
Regular Audits
Periodically review your DNS records to remove outdated entries and verify all records serve legitimate purposes. Unused subdomains or forgotten test records can become security vulnerabilities.
Managing DNS for Multiple Domains
Businesses often manage several domain names—perhaps variations of your brand name or domains for different products.
Centralized DNS Management
Use a single DNS hosting provider for all your domains when possible. This simplifies management, provides consistent interfaces, and makes bulk updates easier.
Domain Forwarding
For domains that should redirect to your primary domain, use domain forwarding (also called domain redirection) rather than creating full DNS zones. This is simpler and more efficient than maintaining duplicate DNS records.
Consistent Naming Conventions
Develop a standard approach for naming subdomains across all your domains. For example, always use "mail" for email servers, "www" for web access, and "shop" for e-commerce. Consistency reduces errors and simplifies troubleshooting.
Documentation
Maintain clear documentation of your DNS configurations, including:
- Which domains you own and where they're registered
- What each domain/subdomain is used for
- Current DNS record configurations
- Nameserver settings
- Contact information for providers
For agencies or businesses managing client websites, reseller hosting solutions often include bulk DNS management tools that streamline operations across multiple domains.
Leveraging Third-Party DNS Services
While your domain registrar provides basic DNS hosting, specialized DNS services offer enhanced features.
Benefits of Third-Party DNS
- Faster global propagation through extensive server networks
- Advanced features like geographic routing and load balancing
- Better DDoS protection and uptime guarantees
- More granular control over DNS records
- Enhanced analytics and monitoring
Popular DNS Providers
Services like Cloudflare, Google Cloud DNS, and Amazon Route 53 provide enterprise-grade DNS hosting with free tiers suitable for small businesses. These services often include additional benefits like CDN capabilities and security features.
Migration Considerations
When moving to third-party DNS:
- Document all current DNS records before making changes
- Set up the complete DNS configuration on the new provider
- Lower TTL on existing records 24 hours before switching
- Update nameservers to point to the new provider
- Monitor propagation and verify all services work correctly
- Keep old DNS records active for 48 hours as backup
Hybrid Approaches
Some businesses use their registrar's DNS for basic records while using third-party DNS for specific subdomains that need advanced features. This hybrid approach balances simplicity with specialized capabilities.
Understanding these advanced techniques helps you optimize DNS performance, enhance security, and scale your infrastructure as your business grows. Start with the basics and gradually implement advanced features as your needs evolve.
Conclusion
Understanding DNS for co.za domains empowers you to take control of your online presence with confidence. We've walked through the entire process—from grasping how the domain name system translates your business name into the IP addresses computers understand, to configuring essential DNS records, managing propagation, and troubleshooting common issues.
The key points to remember: DNS serves as the internet's directory service, connecting your memorable .co.za domain to your web server, email services, and other online tools. ZARC operates .co.za domains with world-class security standards right here in South Africa, ensuring reliable infrastructure for your business.
Setting up DNS requires three essentials—a registered domain, access to DNS settings, and your server's IP address—but the process itself follows straightforward steps that anyone can master.
DNS propagation takes 24-48 hours to complete globally, so patience during this period prevents unnecessary panic. Most issues resolve themselves as changes spread across the internet's DNS servers. When problems persist, systematic troubleshooting—verifying records, checking nameservers, clearing caches, and confirming server configurations—usually identifies the solution.
Your Next Steps:
- Register your .co.za domain if you haven't already through a reputable domain registration service
- Gather your prerequisites including web server IP address and any email hosting details
- Access your DNS management dashboard through your registrar or hosting provider
- Configure essential records starting with A records for your website and MX records for email
- Monitor propagation using online DNS checkers to track global updates
- Document your configuration for future reference and troubleshooting
Remember that your web hosting provider should offer support if you encounter difficulties—don't hesitate to reach out for assistance. DNS is fundamental to your online presence, and getting it right ensures your website, email, and other services work reliably for your customers.
Take the time to set up your DNS correctly from the start, and you'll avoid the headaches that come from rushed configurations or misunderstood settings. Your future self will thank you for the careful attention you pay to these foundational technical details today.
You might also like our guides on host websites for clients - a guide for success and DNS propagation.


